Adventures in Low Level Programming
Ohh, this is going to be a fun one! And one I’ve played with in the past to varying degrees of success. What I’m trying to achieve here is simple, I want to boot a computer from nothing to running some C code which prints “Hello, World!” to the screen. The C code will be sitting on a FAT32 drive attached to the computer.
Getting an environment setup⌗
First things first, we’re going to need to get a development environment up and running. We’ll use QEMU as our emulator to allow us to run our code in a nice user-friendly way. Make sure you can get to the point of typing qemu-system-x86_64 into the terminal and having it open up. On ubuntu that’s as simple as installing via apt.
# sudo apt install qemu
We’ll also need a few compilers. First an assembly compiler, you’ll need to be able to run nasm and get the version.
# nasm --version
NASM version 2.14
We’ll need gcc too. This is installed by default on many distributions. Again, you’ll need to be able to run gcc and get the version.
# gcc --version
gcc (Ubuntu 8.3.0-6ubuntu1) 8.3.0
Copyright (C) 2018 Free Software Foundation, Inc.
This is free software; see the source for copying conditions.  There is NO
warranty; not even for MERCHANTABILITY or FITNESS FOR A PARTICULAR PURPOSE.
Both of these can be achieved on ubuntu by installing the packages through the default repos.
# sudo apt install gcc nasm
A little bit of theory⌗
Before we continue, it’s probably prudent to give a little bit of background to what we’re about to try to achieve. The format of a boot sector is actually fairly simple. It’s a set of data at the very start of a physical disk, usually 512 bytes long, that ends in a magic number 0xaa55. That magic number is what tells BIOS that this is indeed a boot sector and not just some random data on a storage disk.
Clearly, 512 bytes isn’t very much to work with, so we’ve got to work fast and efficiently to read from a filesystem further on in the disk where we can load whole kilobyte files(!).
Creating some boilerplate code⌗
First things first, we’ve got to sort out that magic number. Let’s write the simplest assembly program we can that will just hang the computer. Importantly though, it’ll place the magic number at the end of the sector and fill in the rest with 0x0. This will continue to work as we add more and more assembly instructions meaning we never need to think about placing it in the right place.
block:
    jmp block

times 510-($-$$) db 0

dw 0xaa55
Always read assembly top down, so lets take this line by line and analyze what’s happening.
block:
This is a label which we can use to navigate programmatically through our code. These are the basic building blocks of all control structures that we’ll use. Here we’re effectively creating the equivelent of an infinite loop in c:
while(true) {
    // do nothing
}
the next line of code finishes off this infinite loop by jumping immediately back to the label we put in place previously. This line is in two pieces, jmp which is what we call an unconditional jump. We’ll cover this in more detail later but there are other kinds of jump where we can say, for example, only jump if register x is larger than 10. This will give us a foundation for building ‘if’ statements.
jmp block
The final two lines are the ones we need for the boilerplate. The first one fills all but the last two bytes in with 0x0
times 510-($-$$) db 0
Although it looks intimidating, when broken down this line isn’t quite as complicated as it looks. times is the ‘command’ that we’re calling. It effectively has two parameters, so you can think of it like: times <number-of-repetitions> <thing-to-repeat>. In this case we’re repeating 510-$ times. That doesn’t mean much, does it? Well… Let’s break this down even more. We know we want to put two bytes at the end of the file (our magic number), which is why we use 510 here and not 512.
So what we want to know is how many bytes we need to set to 0x0 to fill in space between where we are now and 2 bytes before the end of the file. This is where nasm really helps us as it will keep track of how many bytes through the file we are, that’s what the cryptic $ is. All the dollar does is (at compile time) represent the current position in the assembly file. So what we’re actually doing when we evaluate 510-$ is 510-<current-bytes-into-file> which will give us back the number of bytes we would need to fill with zeros to fill in all but the last 2 bytes of a 512-byte program.
Finally we have the thing we actually want to repeat. In this case db 0 which just says, I want to put a zero byte in the file at this position. Because it’s repeated multiple times we end up with multiple zeros.
All that’s left at this point is to actually stick the remaining two bytes at the end. We can use the dw command for this which stands for data word (previously we used the db command which stands for data byte). We then put the magic number in and we’re done.
dw 0xaa55
Compiling and inspecting our work⌗
Let’s save the above assembly into a file called bootloader.asm and then run nasm bootloader.asm. If we take a look in our folder, we should now see a new file which is exactly 512 bytes long.
# ls -lahtr
total 24K
-rw-rw-r--   1 hhra hhra   55 Oct 06 20:29 bootloader.asm
-rw-rw-r--   1 hhra hhra  512 Oct 06 20:29 bootloader
Looking in the contents of the file with a piece of software called hexdump which allows us to print out the raw bytes of a file, we can see that the file is indeed 512 bytes long, and that it ends in our magic code!
# hexdump bootloader
0000000 feeb 0000 0000 0000 0000 0000 0000 0000
0000010 0000 0000 0000 0000 0000 0000 0000 0000
*
00001f0 0000 0000 0000 0000 0000 0000 0000 aa55
0000200
The way hexdump displays information can be a little weird at first. The first column isn’t actually the data in the file at all, it’s actually the offset from the start of the file. In this case the first line starts at 0000000 which is the beginning of the file. The rest of the first line shows us the first 16 bytes of the file in hexadecimal form. Most of it is zeros apart from the first two bytes which are our opcodes (we’ll get to this in a second). The second line then starts from 0000010 which, surprise surprise, is 16 represented in hex notation.
You’ll notice the file when run through hexdump doesn’t actually look like 512 bytes. That’s because hexdump is nice enough to remove duplicate blocks for us and replaces them with a *. The fourth line in the output then is the last set of bytes in the file.
00001f0 0000 0000 0000 0000 0000 0000 0000 aa55
The beginning of this line starts at the 496th byte in the file (00001f0 in decimal). There are 14 bytes of zeros displayed, bringing us to the 510th byte, and finally aa55 which completes our file at exactly 512 bytes. Absolutely perfect.
Let’s jump back for just a moment now to the beginning of that file where we have the only other two non-zero bytes in the whole thing.
0000000 feeb 0000 0000 0000 0000 0000 0000 0000
Ignoring the zeros on the end, we need to figure out what feeb stands for. We know they are x86 OP codes. Because of the endianeness of the system, they’re actually displayed in a weird order, the argument is coming before the command. The command we need to look up in that case is eb which corresponds to jmp - big freaking surprise. In particular, the command JMP rel8 which means that we want to jump to a position in the file, relative to the current command, specified using an 8bit value. This 8-bit value which is a signed value, in our example is fe in two’s compliment notiation this corresponds to -2. At this point in the file the current position of the program counter (which is what the jmp is relative to) is fe which is two bytes into the file, so jumping two bytes back takes us all the way to the start, completing our loop.
Feel free to experiment with adding further jmp’s and looking at how the soure code changes. In particuar how the number defining how far back we jump changes each time.
Running our code⌗
Now that we fully understand what’s going on underneath, all that’s required now is to actually run the code and see what happens. I’m afraid it won’t be very exciting at this point, but just know that nothing happening is a good sign. If something goes wrong the machine will hard-reset. All it takes now is to attach the 512-byte file to our emulator as though it were a disk and run.
# qemu-system-x86_64 bootloader
WARNING: Image format was not specified for 'bootloader' and probing guessed raw.
         Automatically detecting the format is dangerous for raw images, write operations on block 0 will be restricted.
         Specify the 'raw' format explicitly to remove the restrictions.
This should pop up a new window which looks like this and does absolutely nothing:
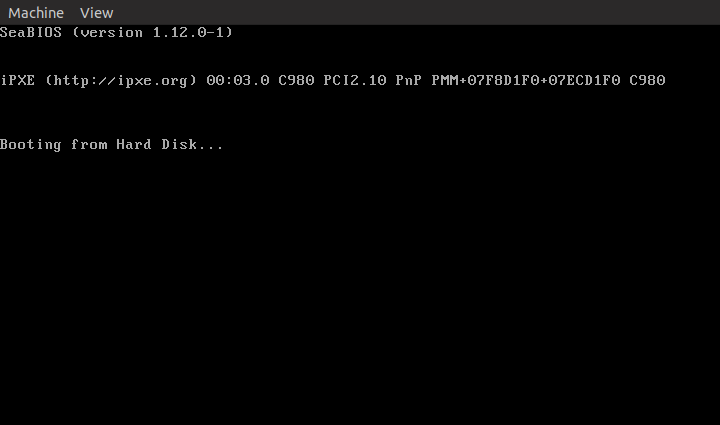
It doesn’t look like much, but this is a big milestone. we’re now executing our own code on a computer with no operating system at all. We’re still nowhere near our original goal, but we’ve now got a platform on which we can build. In the next installment we’ll get text rendering to the screen.