Adventures in Low Level Programming - Text play
This is part two of my adventures in low level programming series. In part one we got our computer to boot and then just sit there spinning it’s wheels. It doesn’t feel like much of an achievement at the moment, but in this installment we’ll start to see something a little more exciting.
Before we get stuck in, we’ll need a little more background though (boo! I know). Obviously at this stage we don’t want to be writing the text rendering code ourselves, nor do we want to be worrying about placement of the characters. Lukily BIOS has got our back at this stage in the boot process.
BIOS Interrupts⌗
So we know that BIOS has got our back on this, but how on earth do we call it to action? That’s where our interrupts come in. Interrupts are a way of ‘interrupting’ whatever the CPU is doing at the time and tell it to temporarily run a different piece of code before coming back and continuing where it left off. Interrupts can be triggered both by code (as we’ll see in a second) and by latency-sensitive hardware such as network cards.
There is a table of interrupts which maps a number to the location of code in memory to deal with that interrupt. For example, 0x10 may point to a location 100 bytes into memory which is where the start of the code to deal with whatever interrupt 0x10 was starts.
Rather than having many many different interrupts, instead it’s common to combine multiple functions into groups and select between them in a switch like manner. For example, there may be one group related to screen functions (0x10) within which you may be able to call functions such as ‘print character’, ‘set cursor position’, or ‘Write graphics pixel’.
Registers⌗
In order to understand how we switch between the options in a particular interrupt, we must also understand one of the most fundamental parts of programming at this low level. Registers! You can think of registers as variables in higher level programming.
Unfortunately, unlike variables in higher level programming, we’re usually limited to only four of them. The registers available on all x86 computers are: ax, bx, cx, dx. Each of these registers holds one word (two bytes) of data.
We can also choose to split each register into high and low bytes, effectively giving us 8 byte registers or 4 word registers. We reference each byte by swapping x for l (low byte) and h (high byte).
Let’s take a look at a quick example of what working with these registers looks like in practice. At this point we’re not yet ready to print out the contents of registers, so instead you’ll just need to trust me that they contain what I say they contain (sorry!).
MOV ax, 0x4534 # ax now contains 0x4534 or 100010100110100 in binary.
MOV bl, 0x45   # bx now contains 0x4500 or 100010100000000 in binary.
MOV bh, 0x34   # bx now contains 0x4534 or 100010100110100 in binary.
In each of the above examples, we’re using the MOV operation which is what we use to move data into, out of, and between our registers. It’s in the format MOV <destination>, <source> where source can be hard-coded numbers (as in our example), other registers, or even pointers to memory.
Printing a character⌗
Now that we’ve got the necessary background out of the way we can begin on the exciting part - printing a single character to the screen! Bear with me though, I promise by the end of this part we’ll be able to print arbitrary strings out.
Beginning from where we left off in the last part, let’s try calling the bios printing routine by using the interrupt 0x10 and function code (that thing we discussed earlier about having multiple functions within a single interrupt) 0x0e to indicate teletype mode.
In this case, we put the function code in ah (the high byte of register a) and the ascii code for the letter we wish to print in al. We then call the 0x10 interrupt (screen functions) to actually execute the code.
mov ah, 0x0e

mov al, 'H'
int 0x10

block:
    jmp block

times 510-($-$$) db 0

dw 0xaa55
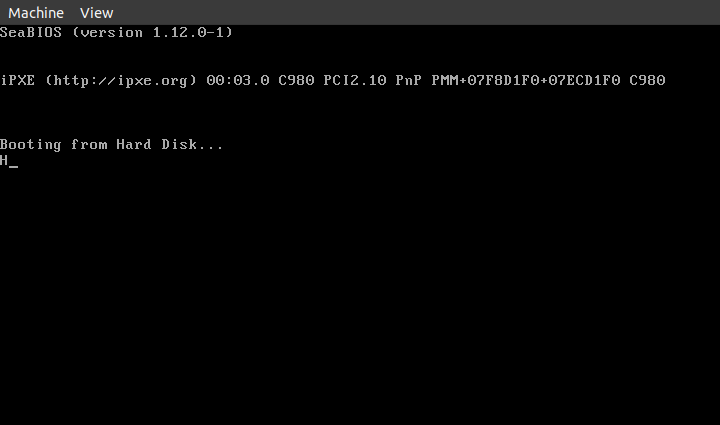
When we compile and run the above using the same command as last time, you should see the same as before but with a ‘H’ now displayed.
We can begin printing whole words by repeating the mov al, H for each letter we wish to print, for example:
mov ah, 0x0e

mov al, 'H'
int 0x10
mov al, 'e'
int 0x10
mov al, 'l'
int 0x10
mov al, 'l'
int 0x10
mov al, 'o'
int 0x10

block:
    jmp block

times 510-($-$$) db 0

dw 0xaa55
(Notice that as we don’t change the value of ah we only need to set it once and then just trigger the interrupt each time we change the value of al)
This method is very tedius however, so we really need to find a way to simplify this printing so we can place a series of characters somewhere in memory and then loop through and print that string of characters to the screen. We’ll need a little more background again to complete this however, so let’s dive in.
Comparing values⌗
We’ll need some way to identify the end of a string. The usual way to do this in programming is to append a zero byte to the end. If you’ve ever programmed in C you’ll probably be familiar with the idea of a null terminated string. In fact, a common cause of bugs is forgetting to null terminate strings and have the print functions over-run into memory further down the line.
In order to detect this zero byte at the end of our string, we’ll need a way of comparing one value against another. Luckily x86 assembly has built in instructions for just this. These functions allow you to conditionally jump and come in many forms - the most common being je (jump if equal), jne (jump if not equal), jg (jump if greater), and jl (jump if less).
Let’s take a quick look at how that looks. In this example, we’ll also use the addition instruction to loop 5 times, printing . each time, and then exiting.
mov ah, 0x0e
mov bl, 0

printloop:
  ; Check if we've printed 5 dots yet.
  cmp bl, 5
  je block

  ; Print another dot.
  mov al, '.'
  int 0x10

  ; Increment our counter
  add bl, 1

  ; Jump to the beginning of our loop
  jmp printloop

block:
    jmp block

times 510-($-$$) db 0

dw 0xaa55
Hopefully the above makes sense, although it looks complicated it’s just a combination of loops and printing which we’ve covered previously. You’ll notice some comments in there too, which begin with ;. We’ll take a quick look at our comparison code to make sure it’s clear what’s happening there.
  cmp bl, 5
  je block
We do comparisons in two parts, first we tell the CPU what to compare (cmp bl, 5) which means we are comparing bl to 5. Notice at this point we don’t declare what we want to know (e.g. greater than, less than, etc…), only what we are comparing.
The next line is where we actually take action based on the outcome of the comparison. In this case, we jump to the block tag if bl equals 5. You can think of this as “jmp if equals”.
Reading from memory⌗
The other piece of required background is being able to read from memory. For this part we won’t concern ourselves with writing to memory programatically, instead telling the assembler to pre-populate part of our code with a particular value. Let’s start with this then, and learn how to pre-populate a piece of memory with a particular string.
...

my_string:
  db 'booting...',0

times 510-($-$$) db 0

dw 0xaa55
For brevity I’ve remove the code previously from the top of the file, represented by .... You’ll notice we start by using my_string: which looks very much like the labels we’ve used previously (block: and printloop:). In fact, as far as the assembler is concerned, there is no difference. All these labels allow you to do is reference a specific place in memory by name. It doesn’t care whether you are using the specific place in memory to jump execution to or move something into a register.
We then use the db that we explained in the last post to place the ascnasm bootloader.asmii characters ‘booting…’ and then a zero at the current point in the program. If we compile what we’ve got so far and take a look at the hexdump output, we can see our characters in the file:
$ nasm bootloader.asm
$ hexdump -C bootloader
00000000  b4 0e b3 00 80 fb 05 74  09 b0 2e cd 10 80 c3 01  |.......t...nasm bootloader.asm.....|
00000010  eb f2 eb fe 62 6f 6f 74  69 6e 67 2e 2e 2e 00 00  |....booting.....|
00000020  00 00 00 00 00 00 00 00  00 00 00 00 00 00 00 00  |................|
*
000001f0  00 00 00 00 00 00 00 00  00 00 00 00 00 00 55 aa  |..............U.|
00000200
Because our whole compiled program gets loaded into memory, this also means that we’ve got out target string in the memory of the computer. Now we just need to actually read it! The code to print the first character of our string looks something like this
mov ah, 0x0e
mov al, [my_string]
int 0x10
We’ll create a new block named printstringdemo which we will be using to store the code for the printing we’re about to do. This can be placed just above the block:.
printstringdemo:
  mov ah, 0x0e
  mov al, [my_string]
  int 0x10
  jmp block

block:
    jmp block
We can then modify our line above to jump to printstringdemo when done instead of block:
  ; Check if we've printed 5 dots yet.
  cmp bl, 5
  je printstrprintstringdemoing
If we compile and run that we should get five dots and then the letter ‘b’. However right now we don’t, this is due to a slight disconnect between our assembler and where our code is loaded into memory. When referencing memory using the [] operator assembly will, by default, reference memory relative to the beginning of our code. This is all fine and dandy assuming our code was loaded at the first byte of memory. As we know, however, the BIOS needs to store other items such as it’s interrupt table before our code.
It turns out, our code is usually loaded at 0x7c00 so referencing memory at address zero doesn’t in fact reference anything in our program. Instead, we need to reference 0x7c00 plus the offset from the start of our program. Luckily, rather than calculating this every time manually, we can put [org 0x7c00] at the very top of our program which will tell our assembler to calculate all references by adding 0x7c00 to the memory address.
Placing that line at the top of the file and compiling again does get us the expected outcome of five dots followed by a ‘b’. Now we’ve got to loop through and print the rest of the characters in our string. To do this, we can re-purpose the bx register and use it to store the current memory address that we need to print out, like so:
printstringdemo:
  mov bx, my_string
  mov al, [bx]
  int 0x10
  jmp block
So far our changes have made no functional difference, but they have given us a very useful tool. We can now increment the value in bx to get the second, third, fouth, and so on bytes of my_string. Let’s get the second byte now and print five dots followed by an ‘o’
printstringdemo:
  mov bx, my_string
  call printcharacter
  jmp block

printcharacter:
  ; Move the value of the current value into bl for printing
  mov al, [bx]

  ; If the value is 0 (indicating the end of the string)
  cmp al, 0
  ; Then jump to printdone
  je printdone

  ; Otherwise print the character
  int 0x10

  ; And then add one to the current address
  add bx, 0x01

  ; And loop
  jmp printcharacter

printdone:
  ; Return to where we were in printstring:
  ret
Putting it all together⌗
Great! We’ve got all the background we need now, and are ready to create a nice usable routine for printing a string to the screen. To use this routine we’ll set bx to the memory location of the first byte of our null-terminated string. When we jump to the routine which will loop through the string one character at a time until we meet the zero byte indicating the end. It will then jump back out of the routine back to where it was called from so we can continue.
Let’s start by creating our block that will demonstrate how we want to use this routine (this should entirely replace the existing printstringemo function):
printstringdemo:
  mov bx, my_string
  call printstring
  jmp block
We’ve got a new instruction here, call. Call allows us to jmp to a routine, but then remember where we were and jmp back to where we were. Very useful here where we may want to print something out, and then continue with other processing. We’ll see how we jump back in a second.
Now that we know exactly how we want to call our routine, let’s create the entrypoint.
printstring:
  ; Initialize interrupt to printing character
  mov ah, 0x0e
  ; Jump to the character printing routine
  jmp printcharacter
We now need to implement the character printing routine, which will keep looping until it sees a zero, at which point it will jump to a finishing routine.
printcharacter:
  ; Move the current character to print to al
  mv al, [bx]
  ; Check if the current character to print is zero
  cmp al, 0
  ; If it was zero (indicating end of string), jump to the finished routine
  je printdone

  ; Print the character
  int 0x10

  ; Increment the counter and loop
  add bx, 0x01
  jmp printcharacter
Finally, we need to return to where we were called from, we do this in the printdone block as such:
printdone:
  ret
ret here is the instruction that tells us to jump back to the last call function.
Putting it all together now leaves us with a complete assembly file that looks like:
[org 0x7c00]

mov ah, 0x0e
mov bl, 0

printloop:
  ; Check if we've printed 5 dots yet.
  cmp bl, 5
  je printstringdemo

  ; Print another dot.
  mov al, '.'
  int 0x10

  ; Increment our counter
  add bl, 1

  ; Jump to the beginning of our loop
  jmp printloop

printstringdemo:
  mov bx, my_string
  call printstring
  jmp block

printstring:
  ; Initialize interrupt to printing character
  mov ah, 0x0e
  ; Jump to the character printing routine
  jmp printcharacter

printcharacter:
  ; Move the current character to print to al
  mov al, [bx]
  ; Check if the current character to print is zero
  cmp al, 0
  ; If it was zero (indicating end of string), jump to the finished routine
  je printdone

  ; Print the character
  int 0x10

  ; Increment the counter and loop
  add bx, 0x01
  jmp printcharacter

printdone:
  ret

block:
    jmp block

my_string:
  db 'booting...',0

times 510-($-$$) db 0

dw 0xaa55
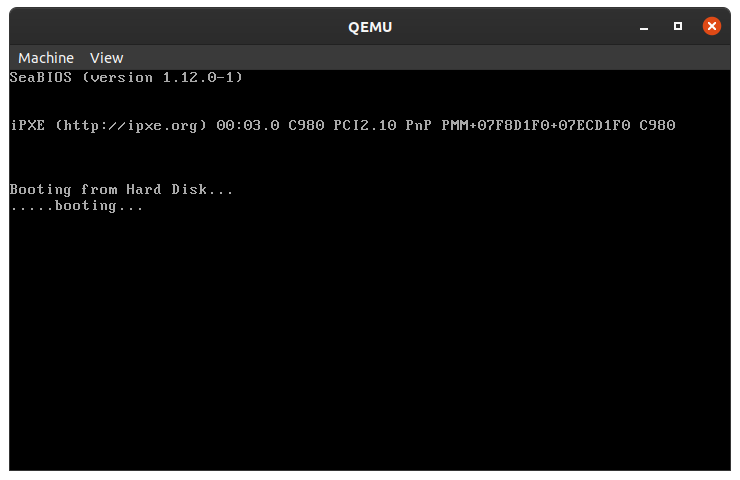
Running which gives us five dots and then our string (“booting…”).
aaannnddd finally, that’s us done! Lots of work just to print a single string to the screen right? There’ll be a much shorter post next time (I promise! I need a break as much as you do) about the layout of our project where we begin to set ourselves up for expanding on what we’ve done so far.